| View previous topic :: View next topic |
| Author |
Message |
RATFather
DeleD PRO user
Joined: 28 Nov 2008
Posts: 16
|
 Posted: Thu Dec 04, 2008 10:58 am Post subject: RATFathers Ghost House - WIP Posted: Thu Dec 04, 2008 10:58 am Post subject: RATFathers Ghost House - WIP |
 |
|
So here we go...
My 1st project begins. This thread will be my running WIP chock full of screenies, links to files, whines, complaints, frustrations, questions, and finally, hopefully, an actual rendered model complete with textures.
It would be VERY appreciated if some of you kind people (should you have the time) peruse what I put here and let me know where I'm 'F'ing up.
As a caveat, this model is not intended to go into any game engine. I am doing this model for the sole purpose of learning as I go and pushing my personal limits to the hilt. There is no better way to learn than to jump in with both feet first screaming "move outta the way pansy boy!" while clutching a coffee cup and a lit cigarette.
Anyway, here is the original webpage of my project. Of course, this means that the model is NOT based on original work done by me. If I complete this to be something I actually am not embarrassed of, then I will email them and give them the model. It's their Intellectual Property after all.
Yes, it's a paper craft project. But as I have found (expressed in a previous post), paper models are in effect perfectly scaled blueprints of every piece at every angle. Pretty neat actually.
I just spent the last two nights separating all the pieces to go into a 'blueprint' form of reference for background images in the different 2D views. I brought them all from pdf, to Photoshop, cut up the different pieces, then saved them all as .jpg files.
There are 42 of them, so I don't think people would appreciate it if I posted all those thumbnails here. So instead I made a new Photobucket album specific to this project. It would be appreciative if someone could review these images and let me know if I'm on the right track or what I need to do different.
Ghost House Reference Blueprints
As I have always tried to tell my junior squids: "Remember the 7 'P's!!":
Proper
Prior
Planning
Prevents
Piss
Poor
Production!
So, I've been trying to prepare properly. This leads me to my 1st, 2nd, and 3rd question of the WIP:
1: Using background images as Blueprint references; did I do the correct thing by saving them as .jpg, or should I have used a different format? Such as .png with Alpha Mapping?
2: When I make two separate images in the project, and I move them together to where two faces are touching each other, should I somehow find a way to permanently connect them so the rendering engine doesn't have to worry about non-visible vertices? This seems like it may be an issue in gaming engines...
3: Is it possible to bring an object previously created into a new project scene? In other words... If I create a fence as one model, save and close it - then create a new model, like a tree, in a whole new scene can I insert the previously made fence model into the new tree project?
All opinions and tips welcomed with open mind and arms. 
Thank you all for your time folks!
Have a great DeleDay!
- RF
p.s. yeah.... sorry.... my posts tend to be long. I'll try to be less winded and not bore the crap outa you all next time.
_________________
"Old programmers never die...
They just GoSub with no Return." |
|
| Back to top |
|
 |
elementrix
DeleD PRO user

Joined: 11 May 2006
Posts: 1300
Location: The Netherlands
|
| Posted: Thu Dec 04, 2008 11:26 am Post subject: |
|
|
hey there, nice project, I was just eating so I don't mind long reads:P
nice start with the paper model cut outes (on my school the first project with maya very similar like this because you learn alot about going from 2D into 3D, and it's pretty simple (and somewhat lazy but it's a start;)))
about your questions:
1_ jpg is perfect but sometimes a bit low quality (also note that deled only supports jpg and bmp as background images so your doing it right)
2_ I think you mean when 2 vertices share the same spot in 3D space? then you just have to press "weld" in vertex mode to make them 1
3_ sure it is possible, if you have a fence for example in a seperate scene, go to file - export to deled prefab, and save it in the folder you want(or make a new one named hountedhouse or something) then when you open your other scene, you go to the right of the screen, below item creation, then you expand prefabs, and you will see your model somewhere there, then select the model, click somewhere in a 2D view and voila there it is.
_________________
Chickens RULE | www.elementrix.nl |
|
| Back to top |
|
|
RATFather
DeleD PRO user
Joined: 28 Nov 2008
Posts: 16
|
| Posted: Thu Dec 04, 2008 11:30 am Post subject: |
|
|
Hi elementrix!
Thank you for your quick reply! I'm Alt-Tabbing between DeleD itself and the forums. lol
_________________
"Old programmers never die...
They just GoSub with no Return." |
|
| Back to top |
|
|
Mr.Fletcher
DeleD PRO user

Joined: 07 Aug 2004
Posts: 1772
Location: Germany
|
| Posted: Thu Dec 04, 2008 12:20 pm Post subject: Re: RATFathers Ghost House - WIP |
|
|
| RATFather wrote: |
2: When I make two separate images in the project, and I move them together to where two faces are touching each other, should I somehow find a way to permanently connect them so the rendering engine doesn't have to worry about non-visible vertices? This seems like it may be an issue in gaming engines... |
I would always advice you to weld vertices, as elementrix said, if they are supposed to be connected. It also makes modeling easier. But make sure you do it before you have assigned UV coordinates, because welding will destroy it in the current DeleD version (bug).
Also, for the blueprints, make sure they all have the same scale so the different parts of the house will fit.
Nice project and good luck!
_________________
Behold! The DeleD Wiki! Please help us expanding it
DeleD on IRC |
|
| Back to top |
|
|
RATFather
DeleD PRO user
Joined: 28 Nov 2008
Posts: 16
|
| Posted: Thu Dec 04, 2008 12:37 pm Post subject: |
|
|
Thank you!
Yes, I have actually been finding it difficult to manipulate the blueprints as a background image.
Instead I have created a plane and UVed the plane with the blueprint as if it was a texture of its own. This has allowed me to manipulate the plane directly affecting the scaling properly the way I need.
So far, so good....
Neat stuff!
- RF
_________________
"Old programmers never die...
They just GoSub with no Return." |
|
| Back to top |
|
|
RATFather
DeleD PRO user
Joined: 28 Nov 2008
Posts: 16
|
| Posted: Thu Dec 04, 2008 8:47 pm Post subject: |
|
|
Well, well...
This just might work...
Make the Planes, apply 'blueprint' texture, 'fold' the plane to form fit the object shape, apply plane to object, make details and place them accordingly (like window frames, etc.), remove plane...
yeah....

Feeling a bit giddy here.
Too bad I gotta be at work in 45minutes. :\
What do you all think? Am I on the right track?
- RF
_________________
"Old programmers never die...
They just GoSub with no Return." |
|
| Back to top |
|
|
elementrix
DeleD PRO user
Joined: 11 May 2006
Posts: 1300
Location: The Netherlands
|
| Posted: Thu Dec 04, 2008 8:50 pm Post subject: |
|
|
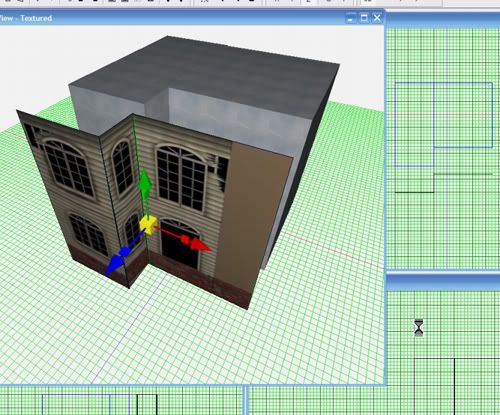
which is the model your actually going to use, the gray "boxlike" house or the planes with the texture on it?
Because if your going to use that box, I see that you made it out of 2 cubes, instead you should make one of the 2 cubes, then connect the upper and lower edge of the face that connects to the other cube, then move the seam to the desired place and extrude the second part out of it.
Also, Im not really sure if you have grid snapping on, but it is really handy to get everything perfectly aligned.
_________________
Chickens RULE | www.elementrix.nl |
|
| Back to top |
|
|
RATFather
DeleD PRO user
Joined: 28 Nov 2008
Posts: 16
|
| Posted: Thu Dec 04, 2008 8:57 pm Post subject: |
|
|
Plan is just to use the plane as a guide to properly scale and place the details. So, my actual model is the box behind the plane. Plane will be deleted when window frames and such are made and placed. Then each item will be textured itself.
I understand what you mean by extruding, but I can't quite picture exactly what your trying to describe...
Also... for some reason 'snapping' for me only seems to work when I am initially creating an object, not when I'm resizing, moving, scaling, or anything else... frustrating.
- RF
_________________
"Old programmers never die...
They just GoSub with no Return." |
|
| Back to top |
|
|
elementrix
DeleD PRO user
Joined: 11 May 2006
Posts: 1300
Location: The Netherlands
|
| Posted: Thu Dec 04, 2008 8:59 pm Post subject: |
|
|
when you move vertices, do they snap ?
about my explanation, it's getting harder and harder for me because my mind is switching to maya tools, so I would think just split the poly but you don't have that in DeleD
to make it more simple, make a cube:
trying to kinda draw it:
_______
l l
l l
l l
----------
and then extrude both sides like this:
_______________
l l l
l l l
l l l
---------------------
l l
l l
----------
*These are topviews
EDIT: NOOO all the spaces are gone:O
_________________
Chickens RULE | www.elementrix.nl
Last edited by elementrix on Thu Dec 04, 2008 9:03 pm; edited 1 time in total |
|
| Back to top |
|
|
RATFather
DeleD PRO user
Joined: 28 Nov 2008
Posts: 16
|
| Posted: Thu Dec 04, 2008 9:02 pm Post subject: |
|
|
No.
What am I doing wrong? I'm sure it's 'newb user error.'
_________________
"Old programmers never die...
They just GoSub with no Return." |
|
| Back to top |
|
|
elementrix
DeleD PRO user
Joined: 11 May 2006
Posts: 1300
Location: The Netherlands
|
| Posted: Thu Dec 04, 2008 9:04 pm Post subject: |
|
|
it sure is, you have snapping off, press F8 or turn on SNAP in the bottem of the screen by double clicking on it.
_________________
Chickens RULE | www.elementrix.nl |
|
| Back to top |
|
|
RATFather
DeleD PRO user
Joined: 28 Nov 2008
Posts: 16
|
| Posted: Thu Dec 04, 2008 9:05 pm Post subject: |
|
|
Your saying make a cube split by a vertices, then extrude the side of the far verice of the cube?
... wordy
<.<
_________________
"Old programmers never die...
They just GoSub with no Return." |
|
| Back to top |
|
|
RATFather
DeleD PRO user
Joined: 28 Nov 2008
Posts: 16
|
| Posted: Thu Dec 04, 2008 9:07 pm Post subject: |
|
|
| elementrix wrote: |
| it sure is, you have snapping off, press F8 or turn on SNAP in the bottem of the screen by double clicking on it. |
Yeah. Did that. 'Snap' is bright and bold down there. Snap works on initial object creation, just nothin' else, even after cycling F8 and watching it grey out and back in.
_________________
"Old programmers never die...
They just GoSub with no Return." |
|
| Back to top |
|
|
Jeroen
Site Admin

Joined: 07 Aug 2004
Posts: 5332
Location: The Netherlands
|
| Posted: Thu Dec 04, 2008 9:12 pm Post subject: |
|
|
Here's what you can try:
- create a cube
- select two opposite edges from one polygon
- connect them
- goto Vertex mode
- you should see new vertices on those two edges: select those
- move them to the desired seam
- now select one of the two polygons that were created when you connected the original edges
- extrude that polygon
That should do it.
_________________
Check out Figuro, our online 3D app! More powerful 3D tools for free. |
|
| Back to top |
|
|
elementrix
DeleD PRO user
Joined: 11 May 2006
Posts: 1300
Location: The Netherlands
|
| Posted: Thu Dec 04, 2008 9:19 pm Post subject: |
|
|
yeah that's what I ment, but that is more organised.
BTW, snapping doesn't work in 3D view if that's what your trying to do?
_________________
Chickens RULE | www.elementrix.nl |
|
| Back to top |
|
|
|

